Solutions and Approaches for Visual Aids

Whenever possible, incorporate the following into your preventive disaster and emergency preparedness measures:
1. Large-format and high-contrast maps: These should be specifically designed for people with visual impairments. When possible, print your maps in a larger scale to make details more visible. Use bold colors and clear lines to highlight all important elements. Utilize easy-to-understand symbols for buildings, roads, and landmarks.
2. Use tactile maps as well: This allows affected individuals to read the maps by touch. Use raised lines and points to better represent roads, paths, and landmarks. Create tangible symbols for different landmarks, like familiar buildings, trees, or water sources.
3. Whenever possible and available, utilize digital maps and navigation apps specifically designed for individuals with visual impairments. These apps should feature zoom functions for enlarging details to improve readability. Additionally, integration of voice output to read instructions and information aloud is recommended. Ensure that there are options to customize the colors and contrasts of the map display.
4. Use compasses with visual and tactile indicators. Large, easily readable letters and numbers are essential. It is also beneficial if the compass includes raised markings for the cardinal directions (N, S, E, W) to facilitate orientation.
5. Practice and train with maps and compasses. Simulate navigation tasks in various environments, such as your city, the city park, or the forest. If possible, personalize your maps to suit specific needs, like the route to school or work. Regularly practice overcoming challenges together and continuously learn from one another.
Practice a group hike in the forest, using your maps and compasses to find the way. Your maps might highlight prominent landmarks like large trees, bridges, or rocks and include raised symbols for these landmarks. Set a common goal, such as finding the highest point in the forest or following a trail to a specific tree. You can also do this in your city or town with objectives like "Find the nearest café" or "Navigate to our favorite picnic spot in the city park." Let your imagination run wild ...
BUT make sure to practice this scenario

Simulate a power outage at your house or apartment, where the family must find a safe way outside using a map and compass. Focus should be on the readability and accessibility of visual information to ensure that even people with, for example, myopia, can effectively navigate.
1. Design large-format and high-contrast maps of your house/apartment, highlighting clear markings for escape routes, doors, and windows.
2. Use bold colors for different areas, e.g., red for your escape routes, blue for danger zones.
3. Utilize clear and simple symbols to mark all important points, e.g., flashlights, LED candles, first aid kit, cabinet with emergency blankets or sleeping bags.
4. Attach raised lines along walls and floors of your escape routes that can be easily felt.
5. Use different textures for various indicators, e.g., smooth lines for your escape routes, rough dots for hazards.
6. Explain the purpose of this drill to all family members and emphasize the importance of finding the way even in complete darkness. Assign each person a specific role and task again. Turn off all lights in the house/apartment to truly simulate darkness. Everyone receives a flashlight, but it should only be used in an emergency to maintain the drill's realistic nature. Designate a starting point for the drill, e.g., the living room. Provide each family member with a highly legible, easy-to-understand map of the house/apartment. The "leader" demonstrates how to use compasses to determine the correct direction. All family members should also practice feeling the raised lines and markings along escape routes to use their sense of touch for orientation when their vision is completely restricted. Ensure that all members reach the designated safe meeting point outside the house/apartment. Gather and immediately verify that everyone has arrived at the agreed meeting point safely. Conduct a review and feedback session to adjust your maps based on the feedback from all family members to make them even more effective. You can also expand your drills by introducing additional visual and tactile tools, such as illuminated escape lamps or mobile apps (acoustic and visual signals), and integrate them into your practice. Schedule regular repetitions of the drill to continuously improve the response capability.
Tips for raised lines and markings (There are many options and solutions - the choice and personal preference are entirely up to you)
Raised lines and markings can be added along your walls and floors to create a tactile escape route that you can follow by touch in case of restricted visibility.
Raised Floor Strips:
- Use non-slip, raised floor strips made of rubber or plastic along your escape routes.
- Securely stick or screw the strips to the floor to create a clear and palpable path, e.g., a 5 cm wide raised strip running from each room to the exits.
Raised Wall Markings:
- Use raised wall stickers or rails made of plastic or metal.
- The markings should be easily discernible by touch and placed at regular intervals.
- For example, install raised rails at a height of about 1 meter along the escape routes, easily reachable by hand.
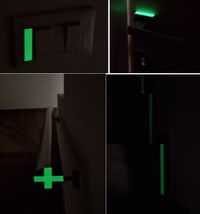
Luminous Strips:
- Use luminous paint or glowing adhesive strips that remain clearly visible in the dark.
- Combine these with the raised lines to provide both visual and tactile cues, e.g., a fluorescent strip along the raised floor strips for additional visibility in low light.
Different Textures for Various Indications:
- Use different textures for various indications to create tactilely distinguishable cues for escape routes, hazard zones, and safe areas.
- For example, use smooth, non-slip rubber or PVC strips. The strips should run long and continuously along the escape routes. Example: A smooth, wide strip leads from the bedroom to the front door/apartment door.
- Use rough dots for hazards (rough, abrasive materials like sandpaper or ridged rubber stickers). Place these markers near hazard zones such as stairs, sharp table and cabinet corners, or electrical appliances. For example, rough dots on the edge of stair steps to indicate the hazard.
- Use grooved lines for safe areas (grooved or wavy materials that feel pleasant to touch). Mark safe areas or gathering points with these lines. Example: Grooved lines around the safe meeting point outside (garden/courtyard) to make it easily recognizable.
Let your imagination run wild, and you'll see how much fun it can be to optimally and resiliently prepare for emergency situations.
Here are our myopia scenario planning tips
Check out a possible extension to our disaster preparedness portfolio - topic "Eyes"


This contribution was written by Birgit Bortoluzzi, the creative founder of the “University of Hope” – an independent knowledge platform with a mission: to make resilience, education, and compassion visible and audible in a complex world.